Have you ever had a shoulder pain that seems to have crept up on you for no traumatic reason? Maybe it’s a too-much-sitting-not-enough-moving type of injury or the too-much-moving-in-poor-posture sort of injury. It could be a problem of alignment.
If you have been following this blog, you are already familiar with the link between diaphragm dysfunction and low back pain. Perhaps your shoulder pain could also benefit from the inclusion of respiration activities. The exercises described in this post are meant to provide you with a possible home remedy for non-traumatic shoulder pain; and to alert you to an important, but possibly missing, piece of your prescribed home exercise program following traumatic shoulder injury.
Most gym workouts targeting the upper body focus on the visible outer layer of muscles to develop shoulder strength. Lying deep to those is the rotator cuff, a more delicate group of muscles that stabilize and guide the bones to articulate properly within the primary shoulder joint. If the shoulder muscles aren’t balanced in strength, or the shoulder is not aligned with good posture, these deeper muscles and their associated tissues cry out with pain.
Dysfunctional breathing patterns and poor position of the diaphragm leads to imbalanced inhalation and twisting in the rib cage. If your shoulder blades are sitting on a misaligned rib cage your shoulder is out of alignment. Exercises for stabilizing the shoulder blades are essential to every home exercise program for shoulder rehabilitation. Unfortunately, these exercise programs often lack respiratory activities to address the ribcage component; this may result in stabilizing yourself in poor position – a situation that leads to abnormal wear and tear on the shoulder complex.
Various postural bodywork disciplines, including the Rolf Method of Structural Integration, address alignment quite effectively. As a living, breathing, moving human being, your muscles also need to be trained to support your alignment. The exercises described in this post train the muscles that influence the ribcage.
The diaphragm muscle has an elaborate array of connections and influences in the human body as described here. The Postural Restoration Institute and the therapists trained in their method have had excellent results treating chronic pain by incorporating diaphragm training into their home exercise routines; considering the proximity of the shoulder girdle to the rib cage it makes sense to include this training in shoulder rehabilitation.
The first exercise described below was previously included in my blog post The Diaphragm is a Core Muscle. The second exercise – 90/90 Bridge with Ball and Balloon – was designed by the Postural Restoration Institute; a thorough rationalization for this exercise was published in the North American Journal of Sports Physical Therapy in 2010. Though I recommend it here for shoulder pain, it was originally developed as a remedy for low back pain, another condition often attributed to misalignment.
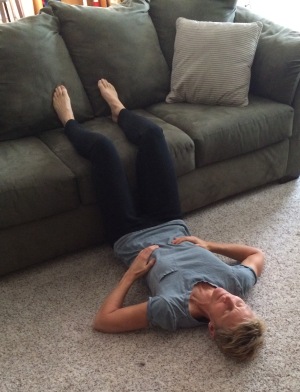
DIAPHRAGMATIC BREATHING EXERCISE
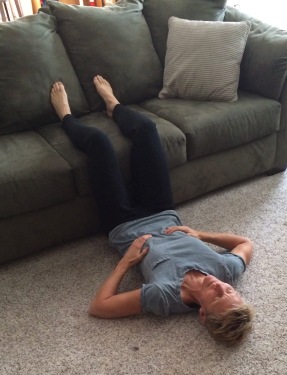
- Lie on the floor with your legs up on a chair or couch so that your hips and knees are at right angles. This passive position allows you to focus your attention on your breathing mechanics while allowing your body to settle into balance.
- Place your hands on the sides of your ribcage and abdomen.
- Expand your abdominal region and your chest as you breathe in. This expansion naturally occurs when the diaphragm descends and displaces the abdominal organs outward.
- Allow the expansion of your ribs out to the sides to create space for the air filling up your lungs.
- Your shoulders should not move toward your head as this indicates unnecessary contraction of the neck and upper chest muscles – a breathing pattern that can lead to fatigued and tender neck muscles.
- Practice breathing into your abdomen in this position for 10 minutes a day to regulate your nervous system and to bring awareness to how it feels to breathe correctly.
90/90 BRIDGE WITH BALL AND BALLOON
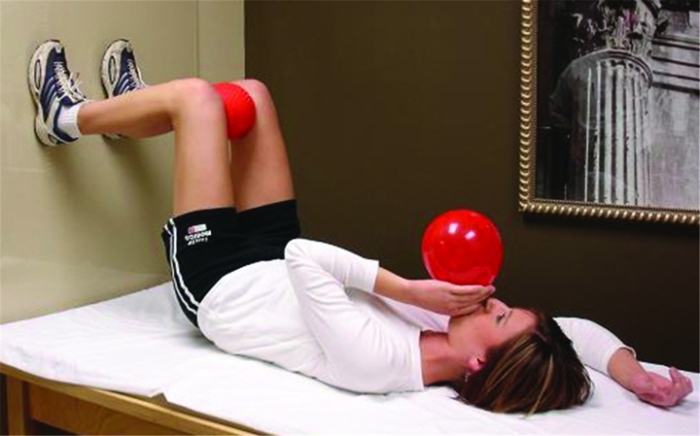
- Lie on your back with your feet flat on a wall and knees and hips bent to a 90-90 degree angle
- Place a 4-6 inch ball between your knees, squeezing with light pressure on the ball
- Hold the balloon in one hand and place the other arm above the head in a relaxed position
- Perform a posterior pelvic tilt (tailbone is slightly raised off floor, the back is flat against the floor). Make sure you are not pushing your feet into the wall, but rather slightly pulling your heels down, contracting your hamstrings. Maintain this position throughout the exercise!
- Inhale through your nose (~75% of max) and slowly blow out into the balloon (3-4 seconds)
- Pause for 3 seconds with your tongue on the roof of your mouth to prevent airflow out of the balloon and without pinching the neck of the balloon
- Inhale through your nose again, and slowly blow back out into the balloon (Do not perform too forcefully, you should not be straining your neck or cheeks)
- Repeat breathing technique a total of 4x
- After the 4th breath in, pinch the neck of the balloon, remove it from your mouth, breath normally and let the air out of the balloon
- Relax and repeat the entire process a total of 5 times!
(Credit for 90/90 Bridge with Ball and Ballon Exercise: “The Value of Blowing up a Balloon” by Kyndall L Boyle, PT, PhD, OCS, PRC; Josh Olinick, DPT, MS; and Cynthia Lewis, PT, PhD